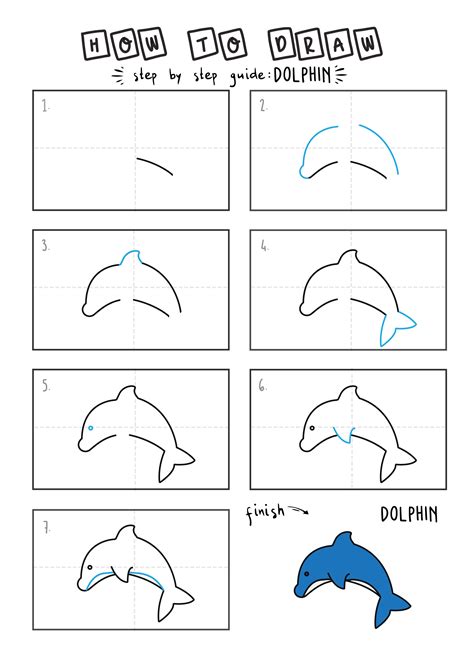
How to Draw a Dolphin: A Step-by-Step Guide for Beginners and Beyond
Want to learn how to draw a dolphin? Whether you're a seasoned artist or just starting out, this guide will walk you through the process, step-by-step. We'll cover everything from basic shapes to adding realistic details, ensuring you create a captivating dolphin drawing. Let's dive in!
Getting Started: Materials and Preparation
Before you begin, gather your art supplies. You'll need:
- Paper: Use drawing paper, sketchbook paper, or even printer paper. The smoother the surface, the easier it will be to blend.
- Pencils: A range of pencils (HB, 2B, 4B) will allow you to create different levels of shading and detail. A mechanical pencil is also a great option.
- Eraser: A quality eraser is essential for correcting mistakes and refining your drawing.
- Sharpener: Keep your pencils sharp for precise lines.
- Optional: Colored pencils, markers, or paints for adding color to your finished drawing.
Step-by-Step Dolphin Drawing Guide
Let's begin creating your dolphin masterpiece! This method focuses on simplicity and accuracy.
Step 1: The Basic Shape
Start by sketching a slightly curved, elongated teardrop shape. This will form the dolphin's body. Don't worry about perfection; this is just a guideline.
Step 2: Defining the Head and Mouth
Add a rounded shape at one end of the teardrop for the dolphin's head. Then, sketch a small, slightly curved line underneath the head to indicate the mouth.
Step 3: The Dorsal Fin
Draw a triangular fin on the dolphin's back. The fin should be curved slightly, mirroring the curvature of the body.
Step 4: The Flippers
Sketch two smaller, slightly curved triangles for the pectoral flippers, positioned near the head.
Step 5: The Fluke (Tail Fin)
At the opposite end of the body, draw a Y-shaped fluke. The fluke is the dolphin's powerful tail fin. Make sure it's proportionate to the body.
Step 6: Refining the Details
Now, refine your initial sketch. Smooth out the lines, adjust the proportions, and add more detail. Consider adding a slight curve to the dolphin's back for a more realistic look.
Step 7: Adding Texture and Shading
Use shading to give your dolphin a three-dimensional effect. Think about where the light would naturally hit the dolphin's body. Use darker shades in the recessed areas and lighter shades where the light would reflect. You can also add texture to the skin by using short, light strokes.
Step 8: Final Touches (Optional)
Once you're happy with your pencil sketch, you can add color using colored pencils, markers, or paints. Experiment with different colors and techniques to create a unique and vibrant dolphin drawing.
Tips for Success
- Practice makes perfect: Don't be discouraged if your first attempt isn't perfect. Keep practicing, and you'll see improvement over time.
- Observe real dolphins: Study pictures and videos of dolphins to understand their anatomy and movement.
- Lighten your lines: Use light pencil strokes initially so you can easily erase and adjust your drawing.
- Have fun! The most important thing is to enjoy the process of creating art.
Beyond the Basics: Exploring Different Poses
Once you've mastered the basic dolphin drawing, try experimenting with different poses. Try drawing a dolphin leaping out of the water, swimming underwater, or interacting with other dolphins. The possibilities are endless!
This comprehensive guide provides a solid foundation for drawing dolphins. Remember to practice regularly and explore your creativity. You'll soon be creating beautiful and realistic dolphin artwork!
