How To Draw a Human: A Beginner's Guide to Anatomy and Proportions
Drawing the human form can seem daunting, but breaking it down into manageable steps makes it achievable. This guide will walk you through the fundamentals of human anatomy and proportions, equipping you with the skills to create believable and expressive figures.
Understanding Basic Proportions
Before diving into intricate details, mastering basic proportions is crucial. A common method uses the "head unit" as a measuring stick. Ideally, an adult human figure is approximately seven to eight heads tall. However, this can vary depending on the individual and the artistic style.
Key Proportional Landmarks:
- Head: The top of the head to the chin.
- Shoulders: Generally, the width of the shoulders is roughly two to three head units wide.
- Torso: The torso extends from the shoulders to the hips, approximately two to three head units long.
- Hips: The width of the hips is roughly the same as the shoulders.
- Legs: The legs, from hip to ankle, are approximately three to four head units long.
- Arms: The arms, from shoulder to wrist, are roughly the same length as the legs.
Essential Anatomy for Drawing Humans
Accurate representation of human anatomy is key to realistic figure drawing. While you don't need to be a medical expert, understanding the underlying structure will significantly improve your drawings.
The Skeleton: Your Internal Framework
Understanding the skeleton provides the foundation for posing and movement. Pay attention to the major joints like the shoulders, elbows, hips, knees, and ankles. These joints dictate how the body bends and moves. Simple stick figure sketches can be incredibly helpful in establishing pose and proportion before adding muscle and detail.
Muscles: Shaping the Form
Once the skeletal structure is in place, you can start to add muscles. Focus on the major muscle groups like the pectorals, biceps, abdominals, and quadriceps. Knowing where these muscles bulge and recede will give your figures a more three-dimensional, realistic look. Don't worry about drawing every single muscle; concentrate on the most prominent ones.
Gesture Drawing: Capturing Movement and Flow
Gesture drawing focuses on capturing the essence of movement and pose. Quick, dynamic sketches emphasize the flow of the figure's lines, focusing on the overall form rather than precise details. Practice gesture drawing from life or reference images to improve your understanding of body movement and fluidity.
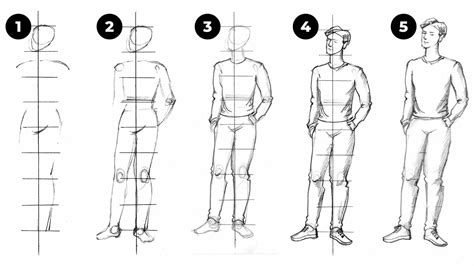
Step-by-Step Guide to Drawing a Human Figure
Let's put this into practice! Here's a simplified approach:
- Start with a basic stick figure: Use circles for joints and lines for limbs. This establishes the pose and proportions.
- Add the basic shapes: Build upon the stick figure by adding simplified shapes like cylinders and ovals to represent the torso, head, and limbs.
- Refine the forms: Start to define the muscles and contours, adding more detail to the figure.
- Add clothing (optional): If desired, add clothing to your figure, remembering how the fabric drapes and folds over the underlying body.
- Add details: Finally, add details such as facial features, hair, and any other specific elements.
Practice Makes Perfect
The key to improving your figure drawing is consistent practice. Regularly sketch from life, using references such as photos, sculptures, or even yourself in a mirror. Experiment with different poses, angles, and lighting conditions. Don't be discouraged by initial imperfections; every artist starts somewhere. Embrace the learning process and enjoy the journey of mastering this challenging and rewarding skill.
Resources for Learning More
While this guide provides a foundation, consider exploring additional resources like anatomy books, online tutorials, and figure drawing workshops to further your skills. Many free online resources are available to help you hone your skills. Remember that consistent effort and practice are your best allies in this artistic endeavor.
