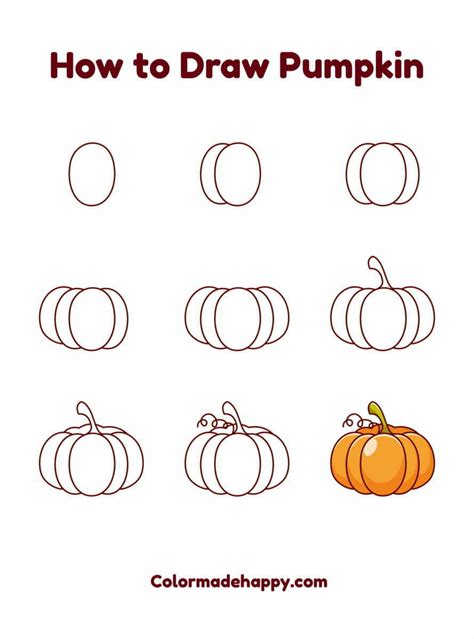
How to Draw a Pumpkin: A Step-by-Step Guide for Beginners
Pumpkins! They're synonymous with autumn, Halloween, and cozy vibes. Learning to draw one is easier than you think, and this guide will walk you through it step-by-step, no matter your skill level. We'll focus on creating a simple, charming pumpkin that's perfect for beginners, but adaptable for more advanced techniques.
Getting Started: Gathering Your Supplies
Before we begin our pumpkin-drawing adventure, let's gather our art supplies. You'll need:
- Paper: Any kind will do—sketchbook paper, printer paper, even the back of an old envelope!
- Pencil: A regular HB pencil is perfect for sketching.
- Eraser: To correct any mistakes. A kneaded eraser is ideal as it's gentle on paper.
- Optional: Colored Pencils, Markers, or Crayons: To add color and vibrancy to your pumpkin once you've finished the sketch.
Step-by-Step Guide to Drawing a Pumpkin
Now for the fun part! Let's learn how to draw a pumpkin in a few simple steps.
Step 1: Drawing the Basic Shape
Begin by drawing a slightly squashed circle. Don't worry about making it perfect; pumpkins are naturally imperfect! Think of a slightly flattened sphere.
Step 2: Adding the Stem
Draw a short, slightly curved line extending upwards from the top of your circle. This will be the pumpkin's stem. You can make it thick or thin, depending on your preference.
Step 3: Defining the Pumpkin's Curves
Now, let's add some curves to give our pumpkin more dimension. Gently add some subtle curves along the sides of the circle, suggesting the rounded shape of a real pumpkin. Avoid making them too sharp or angular.
Step 4: Drawing the Pumpkin's Ribs
Pumpkins have characteristic ridges or ribs. To create these, draw gently curved lines running vertically down the pumpkin's surface. These lines should follow the overall round shape of the pumpkin, not be perfectly straight. Vary the spacing between the lines for a more natural look.
Step 5: Adding Details (Optional)
This step is for those who want to add extra details to make their pumpkin even more realistic. You can add:
- A leaf or two: Draw small, simple leaf shapes attached to the stem.
- A slight shadow: Add a subtle shadow beneath the pumpkin to give it a three-dimensional appearance.
- A little texture: Add tiny, irregular lines to the pumpkin's surface to suggest a slightly bumpy texture.
Step 6: Refining and Erasing
Once you're happy with your pumpkin's shape, gently erase any unnecessary pencil lines. Refine the curves and lines to achieve your desired level of detail.
Step 7: Coloring Your Pumpkin (Optional)
Now, the fun part! Use colored pencils, markers, or crayons to add color to your pumpkin. Traditional pumpkin colors are orange, but feel free to experiment! Try different shades of orange, or even add some green highlights.
Tips for Success
- Practice makes perfect: Don't be discouraged if your first attempt isn't perfect. Keep practicing, and you'll see improvement.
- Light pressure: Use a light pencil touch, especially when sketching the basic shape. This makes it easier to erase mistakes.
- Observe real pumpkins: If possible, observe real pumpkins for inspiration. Pay attention to their shapes, curves, and details.
- Have fun! Drawing should be enjoyable. Relax, let your creativity flow, and enjoy the process.
By following these simple steps, you'll be able to draw your very own charming pumpkin. Remember to practice regularly and experiment with different styles and details. Happy drawing!
