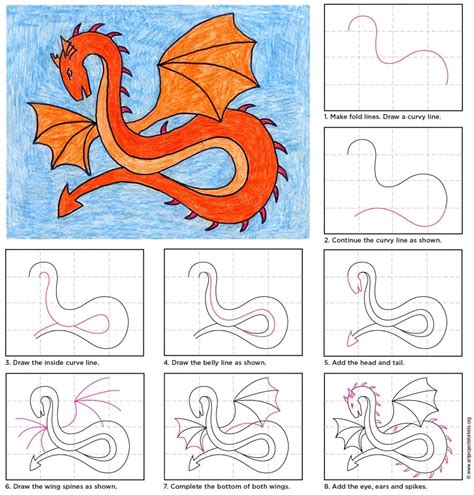
How to Draw a Dragon: A Step-by-Step Guide for Beginners and Beyond
Dragons. Majestic, mythical creatures that have captivated imaginations for centuries. Learning how to draw a dragon can be a rewarding experience, regardless of your skill level. This guide provides a step-by-step approach, catering to both beginners and those looking to refine their dragon-drawing abilities.
Understanding Dragon Anatomy: Before You Begin
Before diving into the drawing process, let's lay some groundwork. Dragons, despite their fantastical nature, have underlying anatomical structures that inform their overall shape and believability. Consider these points:
- Body Structure: Think of a dragon's body as a combination of reptilian and avian elements. They often possess a long, serpentine body, powerful legs similar to a lizard or dinosaur, and sometimes, wings reminiscent of a bird or bat.
- Head and Face: Dragon heads vary greatly depending on the style and species. Some might have sleek, reptilian faces, while others boast more ornate, almost mammalian features with horns, crests, and prominent snouts.
- Wings (Optional): If your dragon has wings, consider their size, shape, and how they connect to the body. Are they leathery, feathered, or something else entirely?
- Claws and Teeth: Sharp claws and teeth are essential dragon features. Don't be afraid to make them prominent and menacing!
Step-by-Step Guide to Drawing a Dragon
Let's create a classic Western-style dragon. Feel free to adapt these steps to your own creative vision!
Step 1: Sketching the Basic Structure
Begin with simple shapes to establish the dragon's overall posture and proportions. Use circles and ovals for the head and body sections, connecting them with lines to form the neck and tail. Lightly sketch in the leg and wing positions.
Step 2: Refining the Body
Develop the shapes from Step 1. Give the body a more serpentine curve, refining the leg and wing positions. Add details like the jawline, snout, and the beginnings of the claws.
Step 3: Adding Details: Head and Face
Now, focus on the head and face. Sketch in the eyes, nostrils, and any horns or crests. Remember to consider the overall expression you want to convey – fierce, majestic, or playful?
Step 4: Defining the Limbs and Wings
Add detail to the legs and wings. Sketch individual digits on the claws and refine the wing membrane structure. Pay attention to muscle definition, especially in the legs and shoulders.
Step 5: Adding Scales and Texture
Dragons are known for their scales. You can add these by drawing small, overlapping shapes along the body, legs, and tail. Consider the size and pattern of the scales to add depth and realism. Don't be afraid to experiment with different scale patterns!
Step 6: Refining Lines and Adding Details
Erase any unnecessary guidelines from the initial sketches. Go over your lines with a darker pencil to give them more definition. Add additional details, such as spines along the back, or intricate patterns on the wings.
Enhancing Your Dragon Drawing
Once you've completed the basic drawing, you can take it to the next level with these tips:
- Experiment with Different Dragon Styles: Research different dragon designs from various cultures and mythologies. This will inspire new ideas and expand your artistic skills.
- Mastering Light and Shadow: Adding shading and highlights will significantly improve the realism and depth of your dragon drawing. Use shading to create a sense of volume and texture.
- Adding Color: Once you're happy with your line drawing, you can add color using pencils, paints, or digital art software. Consider the colors you want to use and how they will contribute to the overall mood.
Conclusion: Unleash Your Inner Dragon Artist
Drawing a dragon is a fantastic way to express creativity and develop your artistic skills. By following this step-by-step guide and practicing regularly, you'll soon be creating stunning dragon artwork of your own. Remember to have fun, experiment, and let your imagination run wild!
