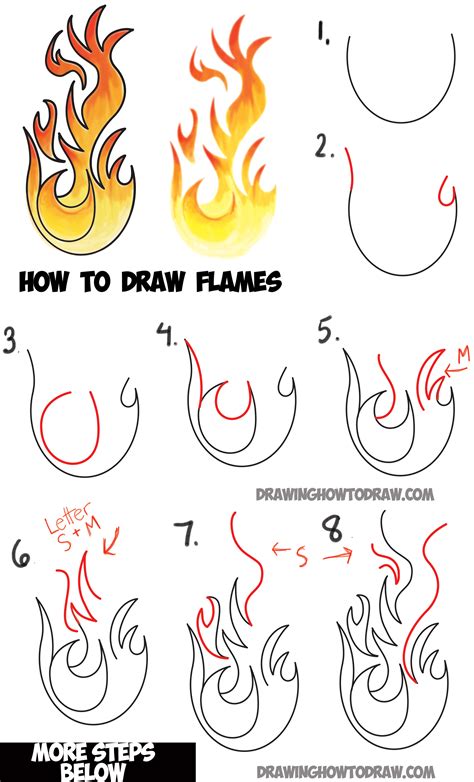
How To Draw Flames: A Guide for Artists of All Levels
Drawing flames might seem intimidating, but with the right techniques and a little practice, you can master this fiery challenge. This guide will walk you through various methods, from simple to complex, ensuring you can depict flames convincingly in your artwork, regardless of your skill level.
Understanding the Nature of Flames
Before you even pick up your pencil, it's crucial to understand what makes a flame look like a flame. Observe real flames – candles, bonfires, even a gas stove – paying attention to these key aspects:
- Shape and Form: Flames are rarely static; they're constantly moving and changing shape. They're not uniform; they have subtle variations in thickness and intensity.
- Light and Shadow: Flames are incredibly dynamic in terms of light and shadow. The brightest parts are usually at the tips, with gradually darkening areas towards the base. Understanding how light plays on the curves and folds of the flame is essential.
- Color Variation: Flames aren't just orange and yellow. They often incorporate reds, oranges, yellows, and even hints of blue and white, depending on the fuel source and intensity.
Simple Flame Drawing Techniques
For beginners, starting with simple techniques is key to building confidence.
Method 1: The Basic Teardrop Shape
- Start with a teardrop: Draw a basic teardrop shape. This will form the foundation of your flame.
- Add pointed extensions: From the top of the teardrop, draw several smaller, pointed shapes that extend upwards and outwards. These represent the flickering tips of the flame.
- Shade and blend: Use shading to create depth and volume. Darker shades at the base, gradually lightening towards the tips. Blend the colors softly for a more realistic effect.
Method 2: The Flickering Lines Technique
- Draw a base: Begin with a short, slightly curved line representing the base of the flame.
- Add wavy lines: From this base, draw several wavy, upward-curving lines of varying lengths. These represent the flickering movement of the flame.
- Vary the line thickness: Make some lines thicker and darker, others thinner and lighter, to show variations in light intensity.
- Add color: Experiment with different shades of orange, yellow, and red to add realism.
Advanced Flame Drawing Techniques
Once you've mastered the basics, you can move on to more complex techniques for a more realistic depiction.
Incorporating Movement and Flow
To capture the dynamic nature of flames, focus on creating a sense of movement and flow. Use curved lines and varying thicknesses to mimic the dancing nature of fire. Don't be afraid to experiment with different shapes and forms.
Adding Details and Texture
Advanced flame drawings benefit from adding details like:
- Flickering highlights: Add small, bright highlights to the tips of the flames to simulate flickering light.
- Smoke and embers: Include subtle smoke trails and glowing embers to add realism and depth to your drawing.
- Surrounding environment: Consider how the flames interact with their surroundings – the shadows they cast, the reflections on nearby surfaces.
Tips for Success
- Practice regularly: The more you practice, the better you'll become at capturing the nuances of flames.
- Use references: Look at real flames for inspiration and guidance. Photos and videos can be incredibly helpful.
- Experiment with different mediums: Try different drawing tools, such as pencils, charcoal, or even colored pencils, to see what works best for you.
- Don't be afraid to make mistakes: Drawing flames is a process of trial and error. Embrace your mistakes, and learn from them.
By following these techniques and practicing regularly, you'll soon be able to draw flames that are both realistic and expressive. Remember, the key is observation and practice. Happy drawing!
