How to Enable Macros in Excel: A Step-by-Step Guide
Excel macros automate repetitive tasks, saving you valuable time and effort. But before you can unleash the power of macros, you need to know how to enable them. This guide provides a clear, step-by-step process for enabling macros in different versions of Microsoft Excel, along with crucial security considerations.
Understanding Macro Security Risks
Before diving into enabling macros, it's crucial to understand the potential security risks. Macros can be used maliciously to introduce viruses or malware to your computer. Therefore, it's essential to only enable macros from trusted sources. Never enable macros from unknown or suspicious emails or websites.
Enabling Macros in Microsoft Excel
The process for enabling macros varies slightly depending on your Excel version. However, the general steps remain consistent. We'll cover the most common scenarios.
Enabling Macros in Excel for Windows
-
Open the Excel Workbook: Start by opening the Excel file containing the macro you want to enable.
-
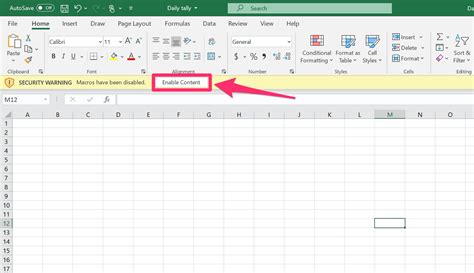
The Security Warning: Upon opening a workbook containing macros, Excel will display a security warning bar at the top. This bar usually indicates that macros are disabled.
-
Enable Macros: The warning bar will offer options. Click on the "Enable Content" button. This will allow the macros within the workbook to run. Exercise caution; only do this if you trust the source of the file.
-
Macro Security Settings (Optional but Recommended): For more granular control over macro security, you can adjust your Excel settings. Go to File > Options > Trust Center > Trust Center Settings > Macro Settings. Here you can choose different security levels:
- Disable all macros without notification: This is the safest option, but it prevents all macros from running.
- Disable all macros with notification: Excel will warn you about macros but prevent them from running automatically.
- Disable all macros except digitally signed macros: Only macros digitally signed by a trusted publisher will run.
- Enable all macros (not recommended): This option is the riskiest and should only be used if you fully understand the implications.
Enabling Macros in Excel for Mac
The process for enabling macros in Excel for Mac is similar:
-
Open the Excel Workbook: Open the Excel file containing the macro.
-
The Security Warning: A security warning will appear, indicating that macros are disabled.
-
Enable Macros: Click on the "Enable Editing" or similar button to enable the macros within the workbook. Again, ensure you trust the source of the workbook before doing this.
-
Adjusting Security Settings (Optional): While the Mac version might not have the same detailed settings as Windows, you can typically find security options within Excel's preferences or settings related to macro security.
Best Practices for Macro Security
- Only enable macros from trusted sources: This is the most important rule. Avoid enabling macros from emails, websites, or files you don't recognize.
- Keep your antivirus software up-to-date: A robust antivirus program can help detect and block malicious macros.
- Regularly update Microsoft Office: Updates often include security patches that address vulnerabilities that could be exploited by malicious macros.
- Be cautious of macros that request unusual permissions: If a macro asks for access to sensitive information, be wary and investigate its legitimacy before enabling it.
By following these steps and best practices, you can safely enable and utilize the power of Excel macros while mitigating potential security risks. Remember, caution and trust are key when dealing with macros.
