How To Make Paper Snowflakes: A Step-by-Step Guide
Winter is coming, and what better way to celebrate the season than by crafting beautiful paper snowflakes? This guide provides a simple, step-by-step process to create stunning snowflakes, perfect for decorating your home or classroom. We'll cover various techniques to help you create unique and intricate designs.
Choosing Your Paper
The type of paper you choose significantly impacts the final look of your snowflake. Here are a few options:
- Standard Printer Paper: This readily available option works well for beginners. It's easy to fold and cut.
- Construction Paper: Offers a wider range of colors and a slightly sturdier feel, resulting in more robust snowflakes.
- Tissue Paper: Provides a delicate, almost ethereal quality, ideal for a softer, more whimsical look. However, it can be more challenging to work with.
- Scrapbooking Paper: For those seeking intricate designs and unique patterns, scrapbooking paper offers a vast selection of colors, textures, and designs.
Basic Snowflake Technique: The Six-Point Star
This classic method is perfect for beginners and yields beautifully symmetrical snowflakes.
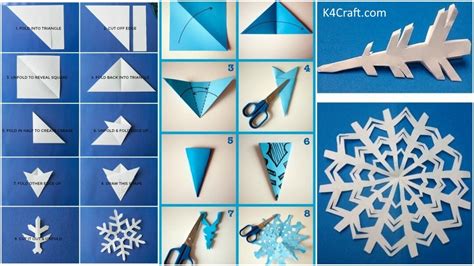
Step 1: Folding the Paper
- Start with a square piece of paper. If you're using standard printer paper, you'll need to cut it down to a square. Fold it in half to create a triangle.
- Fold the triangle in half again.
- Fold the resulting smaller triangle in half once more.
- Important: You now have a small triangle. Round off the pointed end slightly. This will give your snowflake a more delicate look.
Step 2: Cutting the Design
- Begin cutting various shapes along the edges of the folded triangle. Experiment with different patterns – simple cuts, curves, or more intricate designs. Remember, whatever you cut on one side will be mirrored on the other.
- Don't cut all the way to the folded edge! Leave a small margin to keep your snowflake intact.
Step 3: Unfolding Your Masterpiece
Carefully unfold your paper to reveal your unique snowflake! Experiment with different cutting techniques to create various patterns and designs.
Advanced Snowflake Techniques: Beyond the Basics
Once you've mastered the basic six-point star, explore these advanced techniques:
Creating Eight-Point Snowflakes:
This technique requires a different initial fold. Start with a square piece of paper, fold it in half diagonally to create a triangle. Then, fold this triangle in half again, and then in half one more time. Finally, fold the resulting triangle in half one last time. Now you have a long, skinny rectangle. Cut your design and carefully unfold.
Incorporating Different Shapes:
Don’t limit yourself to just cutting straight lines! Try incorporating circles, triangles, and other shapes into your designs for added visual interest.
Using Templates:
If you're feeling less creative, you can find various snowflake templates online. Print them out, trace them onto your folded paper, and cut along the lines.
Tips for Perfect Snowflakes:
- Sharp Scissors: Using sharp scissors makes a huge difference in the precision and cleanliness of your cuts.
- Practice Makes Perfect: Don't be discouraged if your first few attempts aren't perfect. Keep practicing, and you'll quickly improve your snowflake-making skills.
- Experiment with Different Papers: As mentioned earlier, different paper types yield vastly different results.
- Add Some Sparkle: Enhance your snowflakes with glitter glue, sequins, or other decorative elements for an extra touch of magic.
Share Your Creations!
Once you've created your stunning snowflakes, share them on social media using the hashtag #PaperSnowflakes. We'd love to see your creations!
By following these steps and unleashing your creativity, you can easily make beautiful paper snowflakes that will add a touch of winter magic to your surroundings. Happy crafting!
