How To Remove Cache From Chrome: A Step-by-Step Guide
Clearing your Chrome cache can significantly improve your browsing experience. A cluttered cache can lead to slow loading times, website display errors, and even security issues. This guide provides a comprehensive walkthrough on how to effectively remove your Chrome cache on various devices.
Why Clear Your Chrome Cache?
Before diving into the how-to, let's understand why clearing your cache is important. A cache stores temporary files, images, and data from websites you visit. While it speeds up browsing initially, an overflowing cache can cause problems:
- Slow Loading Times: Your browser spends time sifting through outdated or irrelevant cached data before loading new content.
- Website Display Errors: Cached versions of websites can become outdated, leading to broken images, incorrect layouts, and malfunctioning features.
- Security Risks: Outdated cached data might contain vulnerabilities, exposing your system to potential threats.
- Troubleshooting Issues: Sometimes, clearing the cache can resolve unexpected errors or glitches on websites.
How to Clear Your Chrome Cache on Desktop (Windows, Mac, Linux)
The process is similar across different desktop operating systems. Here's a step-by-step guide:
-
Open Chrome: Launch the Google Chrome browser on your computer.
-
Access Settings: Click the three vertical dots in the top right corner (More options) and select "Settings."
-
Navigate to Privacy and Security: Scroll down and find the "Privacy and security" section.
-
Clear Browsing Data: Click on "Clear browsing data."
-
Customize Your Cleaning: A pop-up window will appear. Here, you can customize what you want to clear:
- Basic: Select a timeframe (Last hour, Last 24 hours, Last 7 days, Last 4 weeks, or All time).
- Advanced: Check the boxes next to the data types you wish to remove. For cache clearing, ensure "Cached images and files" is selected. You might also want to select "Cookies and other site data" and "Browsing history," depending on your needs.
-
Clear Data: Click the "Clear data" button. Chrome will now remove the selected data.
Important Note: Clearing your browsing history and cookies will require you to log back into websites you frequently visit.
How to Clear Your Chrome Cache on Mobile (Android & iOS)
Clearing the cache on mobile is slightly different but equally straightforward:
-
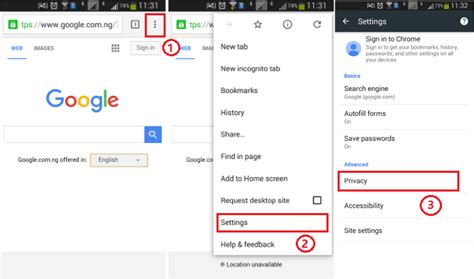
Open Chrome: Launch the Chrome app on your Android or iOS device.
-
Access More Options: Tap the three vertical dots in the top right corner (More options).
-
Settings: Select "Settings."
-
Privacy: Tap on "Privacy."
-
Clear Browsing Data: Choose "Clear browsing data."
-
Customize Cleaning: Similar to the desktop version, select a timeframe and choose which data types to clear. Remember to select "Cached images and files."
-
Clear Data: Tap "Clear data" to complete the process.
Troubleshooting Tips
- Persistent Issues: If problems persist after clearing your cache, try restarting your Chrome browser or even your computer.
- Specific Website Issues: If a particular website is causing problems, try clearing its cache and cookies individually. Many websites offer a "clear cache" option within their settings.
- Extensions: Browser extensions can sometimes interfere with caching. Try disabling extensions temporarily to see if that resolves the issue.
By following these simple steps, you can effectively manage your Chrome cache and maintain a smooth, efficient, and secure browsing experience. Remember to clear your cache regularly to prevent performance issues and potential security risks.
