How to Reset Your MacBook Air to Factory Settings: A Complete Guide
Facing issues with your MacBook Air? A factory reset can often solve problems ranging from sluggish performance to software glitches. This comprehensive guide will walk you through the process of resetting your MacBook Air to its original factory settings, ensuring you're prepared for a fresh start. We'll cover different methods, ensuring you find the best approach for your situation.
Understanding Factory Resets: What to Expect
Before we dive into the steps, it's crucial to understand what a factory reset entails. This process will completely erase all data from your MacBook Air's internal hard drive, including:
- Applications: All installed software will be removed.
- Files and Documents: Everything stored on your hard drive – photos, videos, documents, etc. – will be deleted.
- System Settings: Your personalized settings and preferences will be reset to default values.
Therefore, back up all important data before proceeding! There's no way to recover data after a factory reset. Consider using Time Machine or an external hard drive to create a complete backup.
Method 1: Resetting Your MacBook Air Using macOS Recovery
This is the standard and recommended method for resetting your MacBook Air to factory settings. It utilizes macOS Recovery, a built-in utility.
Steps:
- Back Up Your Data: This is the most crucial step. Ensure you've backed up all important files and data.
- Power Off Your MacBook Air: Completely shut down your computer.
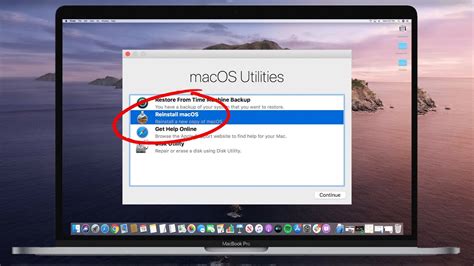
- Start macOS Recovery: Turn on your MacBook Air and immediately press and hold the power button. Continue holding it until you see the startup options window. If you don't see this, try holding down the Command (⌘) + R keys after powering on.
- Select Disk Utility: In the macOS Utilities window, choose "Disk Utility."
- Erase Your Startup Disk: Select your startup disk (usually named "Macintosh HD" or similar) from the sidebar. Click "Erase" in the top menu. Choose "APFS" as the format and give it a name (e.g., "Macintosh HD"). Caution: This action will delete all data on the selected drive.
- Exit Disk Utility: Once the erase process is complete, close Disk Utility.
- Reinstall macOS: Go back to the macOS Utilities window and select "Reinstall macOS." Follow the on-screen instructions. This will download and install a fresh copy of macOS.
- Set Up Your MacBook Air: After the installation is complete, you'll need to set up your MacBook Air as a new computer, choosing your language, region, and other preferences.
Method 2: Resetting Using System Preferences (for less severe issues)
This method is less comprehensive and is generally suitable for minor software glitches. It doesn't erase all data.
Steps:
- Open System Preferences: Click the Apple menu in the top-left corner and select "System Preferences."
- Choose Users & Groups: Locate and click on "Users & Groups."
- Login Options: Click the lock icon in the bottom-left corner and enter your administrator password.
- Reset Password: You can choose to reset the login password here. This is not a full factory reset, but it's a step that can solve some login issues.
Troubleshooting Tips
- Stuck at a certain step? Try restarting your MacBook Air and starting the process again.
- Internet connection needed: Both methods require an internet connection to download macOS. Ensure you have a stable Wi-Fi connection or a wired Ethernet connection.
- Experiencing further problems? If you continue to face difficulties, consider seeking professional help from Apple Support or an authorized service provider.
Remember to always back up your data before attempting a factory reset. This guide provides a detailed approach to resetting your MacBook Air, helping you regain control and resolve various system issues. Choose the method that best suits your needs and remember to proceed cautiously.
