How to Tie a Tie: The Perfect Windsor Knot
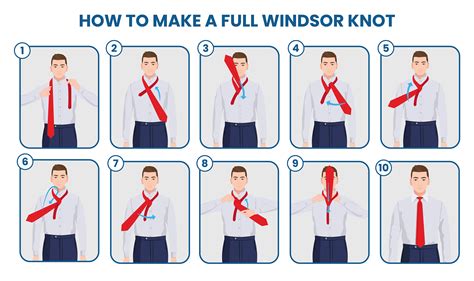
The Windsor knot, also known as the full Windsor, is a large, symmetrical knot ideal for spreading collars and adding a touch of formality to your attire. Mastering this knot elevates your style game, making you look sharp and confident. This comprehensive guide will walk you through the process step-by-step, ensuring you tie the perfect Windsor knot every time.
Getting Started: What You'll Need
Before we begin, make sure you have the following:
- A tie: Preferably a tie made from a fabric that holds its shape well, such as silk or wool.
- A collared shirt: A shirt with a spread collar is recommended, as it best showcases the Windsor knot.
- A mirror: Essential for seeing what you're doing!
Step-by-Step Guide to Tying a Windsor Knot
Follow these steps carefully and you'll be tying a perfect Windsor knot in no time:
Step 1: The Starting Position
- Stand in front of a mirror.
- Place the wide end of your tie on your right side, ensuring it hangs significantly lower than the narrow end (about 12 inches lower is a good starting point). The difference in length is crucial for achieving the correct knot size.
Step 2: The First Cross
- Cross the wide end over the narrow end, bringing it across your body to the left.
Step 3: The Underpass
- Bring the wide end under the narrow end, and up through the loop that you’ve just created.
Step 4: The Front Cross
- Now, cross the wide end over the narrow end again, from right to left.
Step 5: The Second Underpass
- Tuck the wide end under and up through the loop you created around your neck. This step forms the main body of the Windsor knot.
Step 6: Shaping the Knot
- Gently tighten the knot by pulling it up and towards your collar.
- Make sure the knot sits evenly and comfortably against your collar.
Step 7: The Final Adjustment
- Adjust the knot and the overall position of the tie by carefully sliding the knot up and down.
Tips for the Perfect Windsor
- Tie Length: The length difference between the wide and narrow ends is key. Experiment to find the perfect length for your height and build. Too short, and the knot will look cramped. Too long, and it will be bulky.
- Fabric Choice: A stiffer fabric generally works better for this knot.
- Practice Makes Perfect: Don't get discouraged if your first few attempts aren't perfect. Keep practicing, and you'll soon master the art of the Windsor knot.
- Mirror, Mirror: Using a mirror is vital, especially when you're learning.
Beyond the Basics: Variations and Style
While the classic Windsor knot is timeless, feel free to experiment with different tie fabrics and colors to personalize your look. A silk tie will offer a different drape than a wool tie, affecting the knot's final appearance. Consider the occasion when choosing your tie and knot.
Mastering the Windsor knot adds a touch of sophistication to your wardrobe. With practice, you’ll confidently tie this elegant knot, leaving a lasting impression wherever you go. So grab your tie, stand in front of the mirror, and get practicing!
