How To Use Jira for Software Requirements: A Comprehensive Guide
Jira, a powerful project management tool, is often associated with agile development and bug tracking. However, its capabilities extend far beyond that. This guide will show you how to effectively leverage Jira for managing and tracking your software requirements throughout the entire software development lifecycle (SDLC). We'll cover everything from initial requirement gathering to final implementation and testing.
Why Use Jira for Software Requirements?
Before diving into the how, let's address the why. Using Jira for requirements management offers several key advantages:
- Centralized Repository: All requirements are stored in one place, eliminating the confusion of scattered documents and spreadsheets. This improves team communication and reduces the risk of conflicting information.
- Improved Collaboration: Jira's built-in features facilitate seamless collaboration among stakeholders, developers, testers, and product owners. Real-time updates and notifications keep everyone informed.
- Traceability: Link requirements to tasks, bugs, and test cases for complete traceability. This makes it easy to identify the impact of changes and ensure all requirements are addressed.
- Enhanced Visibility: Dashboards and reports provide clear visibility into the status of requirements, helping you identify potential roadblocks early on.
- Version Control: Jira's version control system allows you to track changes to requirements over time, making it easy to revert to previous versions if necessary.
Setting Up Jira for Requirements Management
Effective requirement management in Jira hinges on proper configuration. Here's how to get started:
1. Choose the Right Issue Type:
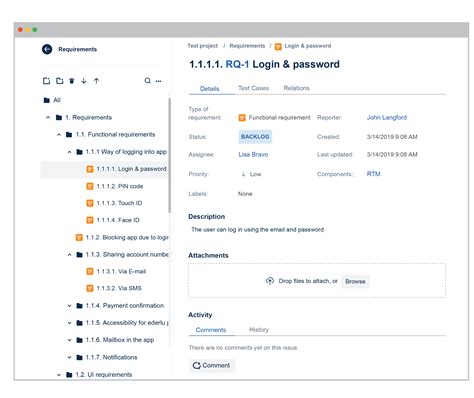
While Jira offers several issue types (Bug, Task, Story), using a custom issue type specifically for "Requirement" provides better organization. This allows you to tailor fields and workflows specifically for requirements.
2. Create Custom Fields:
Customize fields to capture crucial requirement details like:
- Requirement ID: A unique identifier for each requirement.
- Priority: High, Medium, Low, etc.
- Source: Where the requirement originated (e.g., client request, market research).
- Status: Proposed, Approved, In Progress, Implemented, Verified, etc.
- Acceptance Criteria: Clearly defined conditions that must be met for the requirement to be considered complete.
- Business Value: Quantify the value this requirement brings to the business.
3. Define a Workflow:
Establish a workflow that reflects the lifecycle of a requirement, moving it through different statuses as it progresses. A typical workflow might look like this:
- Proposed -> Approved -> In Progress -> Implemented -> Verified -> Closed
4. Utilize Jira's Linking Features:
Link requirements to other Jira issues, like tasks and test cases, to ensure traceability and understand the relationship between various elements of the project.
Best Practices for Jira Requirements Management
To maximize the benefits of using Jira for requirements, consider these best practices:
- Prioritize Requirements: Prioritize requirements based on business value and risk.
- Regularly Review and Update Requirements: Keep requirements up-to-date as the project evolves.
- Use Clear and Concise Language: Avoid ambiguity in requirement descriptions.
- Employ Templates: Create templates for common requirement types to ensure consistency.
- Leverage Reporting and Dashboards: Monitor progress and identify potential issues early.
Conclusion: Mastering Jira for Software Requirements
By effectively implementing these strategies, you can transform Jira from a simple task management tool into a robust platform for managing your software requirements. This leads to better communication, increased efficiency, and ultimately, higher-quality software. Remember, the key is careful planning, consistent execution, and continuous improvement of your processes within Jira to best suit your team's specific needs.
