How To Install Rain Gutters: A DIY Guide for Homeowners
Rain gutters are essential for protecting your home's foundation and landscaping from water damage. While hiring a professional is always an option, installing rain gutters yourself can be a rewarding DIY project, saving you considerable money. This guide provides a step-by-step approach to installing rain gutters, ensuring you achieve a professional-looking and functional result.
Planning Your Gutter Installation
Before you even touch a tool, careful planning is crucial for a successful gutter installation.
1. Measuring and Calculating Materials
Accurate measurements are paramount. Measure the length of each section of your roofline where you plan to install gutters. Consider adding extra length for corners and downspouts. Don't forget to account for the slope necessary for proper water drainage (typically a 1/4-inch drop per 10 feet). This will dictate the number of gutter sections, elbows, end caps, downspouts, and hangers you need. Visit your local home improvement store for assistance in calculating your material needs.
2. Choosing the Right Gutter System
Several types of gutters exist, each with its own pros and cons. Aluminum gutters are popular due to their lightweight nature, affordability, and resistance to rust. Vinyl gutters are also budget-friendly but may not be as durable. Copper and zinc gutters offer superior durability and aesthetics but come with a higher price tag. Consider your budget and the style of your home when making your selection.
3. Gathering Your Tools and Materials
Make sure you have all the necessary tools and materials before you begin. This will streamline the installation process and prevent unnecessary delays. You'll need:
- Measuring tape
- Level
- Drill with appropriate drill bits
- Safety glasses
- Work gloves
- Scissors or tin snips
- Sealant (silicone or butyl rubber)
- Ladder (stable and appropriately sized)
- Gutters, downspouts, hangers, elbows, and end caps (as calculated in step 1)
Step-by-Step Gutter Installation
With your planning complete and materials gathered, it's time to install your gutters.
1. Installing the Gutter Hangers
Begin by installing gutter hangers along the fascia board, maintaining the necessary slope for proper drainage. Use a level to ensure consistent slope. Space the hangers according to the manufacturer's instructions, typically every 2-3 feet. Pre-drilling pilot holes will prevent the fascia from splitting.
2. Attaching the Gutter Sections
Once the hangers are in place, carefully attach the gutter sections, ensuring a snug fit and proper alignment. Use sealant at the joints to create a watertight seal.
3. Installing Elbows and End Caps
Install elbows at corners and end caps at the ends of the gutter runs. Again, use sealant to ensure watertight connections.
4. Installing Downspouts
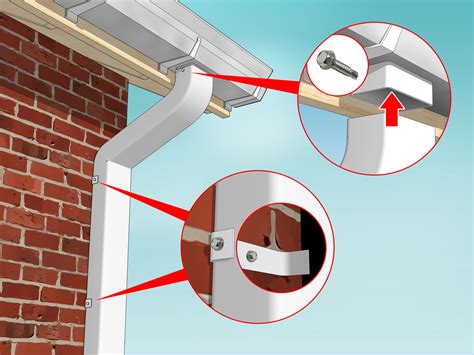
Attach downspouts to the gutters using elbows and straps. Extend downspouts to a suitable drainage point away from your foundation. Consider using extensions if necessary to direct water away from your house.
5. Securing Downspout Extensions
If using extensions, securely attach them to the downspouts and ensure they are firmly planted in the ground or directed into a drainage system.
Post-Installation Tips for Success
- Inspect your work thoroughly: Check for leaks or areas requiring additional sealant.
- Clean your gutters regularly: Prevent clogs by removing leaves and debris.
- Consider gutter guards: These help prevent clogs and reduce the frequency of cleaning.
By following these steps and taking your time, you can successfully install rain gutters on your home. Remember safety is paramount; always use appropriate safety equipment and ask for help if needed. A well-installed gutter system will protect your home for years to come.
